DIY Boho Wall Hanging
I'm so excited to be joining up with an amazing group of bloggers for Swap It Like It's Hot 6! If you're not familiar with what it is, a bunch of bloggers all got together and raided our favorite thrift stores and flea markets to find a few treasures. Then we sent those treasures to each other to makeover, we didn't know what we were getting, and then we had to stretch our creative muscles to create something awesome!
If you are visiting from my friend Stephanie's blog, Casa Watkins Living, welcome! Doesn't she have the most beautiful and colorful home?! If this is your first time visiting, and even if it's not, let me introduce myself. My name is Stephanie, I am a wife, mom, small-town Kansas girl, and blog here at One Mile Home Style. I share my love of home decor, organizing and DIY projects, all with a little bit of a farmhouse/rustic/modern touch. (Really, I don't have a specific style, I like little bits of all styles, and just use what I love!!)
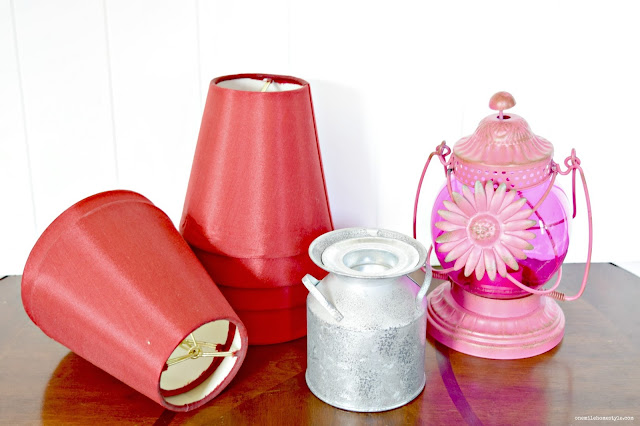
Stephanie sent me this box of goodies, 6 red lampshades, a pink lantern and a little milkcan candle holder(?).
This post may contain affiliate links for your convenience, you can see my full disclosure here.
While I have future plans for the lantern, the lampshades were my chosen victim for this project. At this point you are probably really questioning this project; a boho wall hanging made from lampshades, really? Here is where I started:
The first thing I had to do was get rid of the shade part of the lampshade, the part that I needed was the metal ring at the bottom. They were pretty gross and covered in some type of glue that was a pain to remove. (Goo Gone would have been awesome, but I was out, so I had to soak them in hot water for awhile to loosen up the glue.)
Once they were all cleaned up, I wrapped each ring in yarn, I picked navy blue yarn as my accent color, (Surprise! Surprise!) and conveniently, the little bit of glue residue that was left actually helped the yarn stay in place nicely as I worked.
To create the base of this wall hanging, I looped strands of white and natural colored yarn around a piece of bamboo.
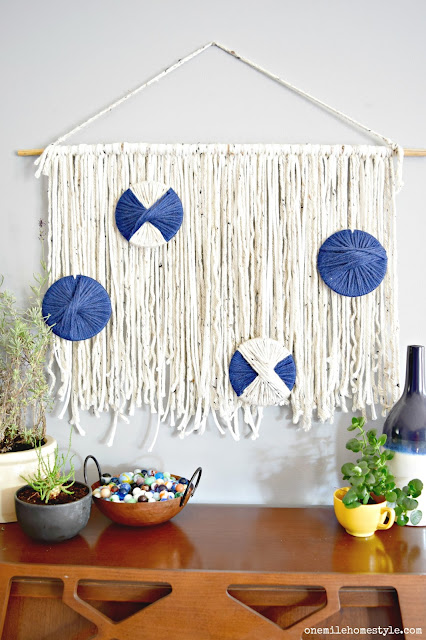
Once all the yarn was added to the bamboo, I attached the navy blue rings, and then added a length of braided yarn to the top for my hanger.
Didn't it turn out great?! While the overall style of my home is definitely not Bohemian, the colors definitely make it my style, and make it fit perfectly in our living room.
I love all the texture and warmth that it adds, and it brings in my favorite navy blue, without being too dark. It's so fun and definitely pays to think outside the box when repurposing thrift store finds, and if you stretch outside you style comfort zone, you may just find your new favorite piece of home decor!
Now, you need to go visit my friend Charlotte at Ciburbanity to see what she created with these goodies that I sent to her. I promise, you will not be disappointed!!
Keep up with everyone this week to see all the creations from this round of Swap It Like It's Hot!
Monday
Tuesday
Wednesday
Thursday
Friday
If you loved this project and want to make your own, don't forget to save it to your home decor pinterest board!


PERFECTION. I love anything with yarn and wall hangings so there's that. And I had NO idea the circles were from lampshades. GENIUS!
ReplyDeleteThanks Charlotte! And thanks for inviting me to join in on the fun!
DeleteLove this so much!! That is a true repurpose- great job!!
ReplyDeleteThanks so much!
DeleteGreat idea - so cool! And I love the blue and white!!
ReplyDeleteThank you! I can never have enough blue and white!
DeleteWow!!!! Just—wow!!! Your wall hanging is gorgeous, and I never would've guessed that you used lampshade rings!
ReplyDeleteThank you! It was such a fun little project to create!
DeleteVery cool! Pinned!
ReplyDeleteThanks so much Ariel!
DeleteThat is so smart, I love that you used the bottom of the shade only! It turned out beautifully!
ReplyDeleteThank you!!
DeleteThat is so smart, I love that you used the bottom of the shade only! It turned out beautifully!
ReplyDeleteThat is the coolest thing I have ever seen!!! Who would have ever thought of that project from old lamp shades...bravo!! BTW, I blog about the exact things you do and I love a mix of decor styles too! Pinning and sharing!!
ReplyDeleteThanks for visiting Susanne, and for sharing!
DeleteSo cool and clever!!!!
ReplyDeleteThis is so pretty! I never would have guessed there were parts of shades in there! XO
ReplyDeleteThanks Christy!
DeleteLove these! I never knew that this project started last old lamp shades!
ReplyDeleteThanks so much!!
DeleteI LOVE this. I know someone who would love this for a Christmas gift!
ReplyDeleteThanks Jessica! I'm thinking I may need to make more of these!
DeleteSuper cute!!
ReplyDeleteThis turned out so pretty! Great job!
ReplyDelete