Golden Home Sweet Home Wall Art: Create and Share
This post was created in collaboration with Walnut Hollow. I was provided with products to complete this challenge, all details, excitement and commentary are my own.
Are you ready for another Create and Share Challenge? This time around, I joined with 28 of my blogging friends and Walnut Hollow to show off all kinds of fun DIY wood home decor. There is list of all their amazing projects at the end of this post; grab a drink, take some time, and check them all out!
I recently updated the look of our family room gallery wall, and this golden home sweet home art added the perfect little bit of rustic texture, and fun color.
Here are the materials you will need to create your own Golden Home Sweet Home wall art:
Here are the materials you will need to create your own Golden Home Sweet Home wall art:
Blue Wood Stain (DIY tutorial coming soon!)
Small Paint Brushes
I have to preface this with the fact that this was my first ever woodburning project, and now I can't wait to do more! It was so fun, and so easy!
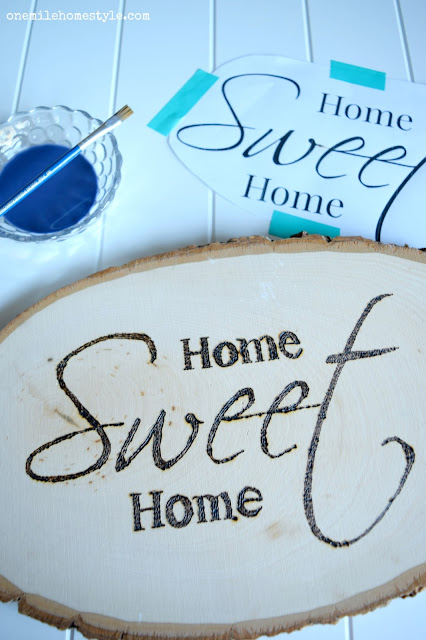
So, the first thing I did was create and print out my text on plain white paper. I played around with the fonts for a while before I found a combination I really liked. To create a traceable template on the wood, I rubbed chalk all over the back of the paper (in hindsight, colored chalk would have been a better choice), taped the paper chalk-side down to my woodslice, and then used the end of a paintbrush to trace over the letters. Carefully remove your paper to see your template.
Definitely start with a scrap piece of wood to practice your wood burning technique before you start on your project wood. I found that working backwords, from right to left, kept me from wiping the chalk off and worked better overall. The number one pointer I have is don't get caught up in making this look "perfect". There are going to be minor imperfections, and that's part of the beauty in this type of project.
Once I was happy with the lettering, I mixed up my own colored wood stain (tutorial to come), and applied it to the entire wood slice.
The wood really soaked up the stain, but I still gave it a few hours to fully dry. Then it was time to really make this wall art shine! Using my favorite color of Rub n' Buff, Antique Gold, and a small paintbrush, I filled in the letters of the word "sweet". This is what takes this little piece of art from simple to show-stopper!
Since I already had the Rub n' Buff out, and a little extra gold never hurt anyone, I added some golden touches to the bark edge too. It's just enough to be noticeable and fun, but isn't super blingy either.
The last thing to do was add a picture hook to the back, and hang my new golden home sweet home art on the gallery wall. It looks so pretty when the sun hits it in morning, and wood adds a warm rustic touch.
This was such a fun little project, and trying out wood burning was a blast! I highly recommend giving it a try, and if you are looking for supplies for decor projects in your home, I highly recommend checking out Walnut Hollow, I'm sure you will find more than enough supplies, and inspiration!
And now for even more inspiration! These ladies knocked it out of the park with all these great projects, I know these will be showing up on my Pinterest boards for sure!
Pallet Tray Projects
Casa Watkins: DIY Succulent Garden Dry Erase Board
Pocketful Of Posies: DIY Military Coin Shadow Box
Vintage Romance Style: Easy DIY Laptop Stand
Shabby Grace Blog: Herb Garden Tray
Vintage Paint and More: DIY Vintage Pallet Tray
Domicile 37: Electronics Tray
Iris Nacole: Bohemian Tray
Lovely Etc: Simple Pallet Photo Display
The Southern Couture: How To Decorate Your Home For Every Season
Green With Decor: Decorating The Bathroom Walls
Medium Basswood Round
Run To Radiance: Faux Succulent Centerpiece DIY
A Shade of Teal: DIY Clock
One Mile Home Style: Golden Home Sweet Home Wall Art
Flourish & Knot: Monogrammed Cheese Board
Lehman Lane: DIY Rustic Boy's Room Sign
Knock It Off Kim: Rustic Treat Stand
Farmhouse 40: Wood Open Sign
DIY Beautify: Wood Slice Clock
Creatively Homespun: DIY Children's Step Stool
Chatfield Court: DIY House Numbers
Large Round Clock
Monica Wants It: Gold Polka Dot Clock
The Twin Cedars: DIY Lazy Susan
Tastefully Frugal: DIY Drum Clock
Uncookie Cutter: Tabletop Clock
The House Down The Lane: Kid's Art Cheese Tray
Refashionably Late: Stenciled Clock
Homeology: Rustic Modern Wall Clock
My Life From Home: DIY Baseball Clock


Love this sign - especially the way you used the gold on the lettering and the edges. So pretty - sophistication with rusticness - perfect.
ReplyDeleteThanks Cathy!!
DeleteThat gold and the wood together is perfection!!!!
ReplyDeleteThank you Tania!
DeleteThis is such a beautiful project, Stephanie! I love how you used the wood burned lettering, gold, and blue all together. Awesome job!
ReplyDeleteThanks Tiffany! I really love the gold on the lettering too!
DeleteThis is beautiful! What a great technique with the burner! I love the way it turned out!
ReplyDeleteThanks April! I think I am addicted to the burner now!
DeleteThis is really beautiful!!! Love the font and how Sweet is styled!
ReplyDeleteSo beautiful! I love it!
ReplyDeleteThanks Iris!
DeleteSuch a pretty addition to your gallery wall. Great transfer method! I must try it.
ReplyDeleteThanks Meghan, the chalk transfer is so easy to do!
DeleteI love the gold. What a great addition to your gallery wall. I am going to have to try that technique! Great job! :)
ReplyDeleteThanks Amy! I am loving the gold accent too!
DeleteI wanted to stop by and let you know that your post has been selected as a Feature for the Welcome Home Wednesdays Link Party! Stop by to see your post linked up and don't forget to grab your Featured Button as well! ~Lisa~
ReplyDeleteLove the gold detail, that turned out so good!
ReplyDeleteStephanie this is sooo pretty!! I love the gold accent. It looks so great with the paint you placed on the basswood! Thanks so much for showing us another great One Mile Home Style creative DIY project!
ReplyDeleteSo pretty! I am a sucker for ALL gold things!! Love it ;) Thanks so much for linking up at the Pretty Project Party --- please join us again this Thursday! We'd love to have you! - Rachael
ReplyDelete