Adding Farmhouse Charm to Ugly Kitchen Cabinets
We are going all in today with an ugly part of our home that I go out of my way to not show you here on the blog. I have shown you shots of our kitchen and dining area, but always from the dining room side, or only above the countertops. See, our kitchen cabinets are a hot mess, and I just decided to never share them.
I think all bloggers have dirty little secrets in their home that they don't want to share, who wants to show off the ugly parts of their home? But, today I'm going to share mine, it's about to get real, are you ready?
So, other than the fact that we have builder grade light oak cabinets that could use a paint job, below you will see that we have a missing door here, that I just pulled off the cabinet one day when I opened it. (You didn't know I had super-human strength, did you?!) And the one right next to it, well, it's hanging on by one hinge. I'm shaking my own head right now at this ridiculousness! Ugh!!
Oh, but it gets better! The two small cabinets by the stove, the glue on those doors came apart, so the one trim piece with the hinges attached is all that is still there on those. So yeah, I pretty much have the open shelving thing going on with my base cabinets. Maybe it's a new trend, and I'm ahead of the curve! Umm, no, but nice try...

This post may contain affiliate links for your convenience, you can see my full disclosure here.
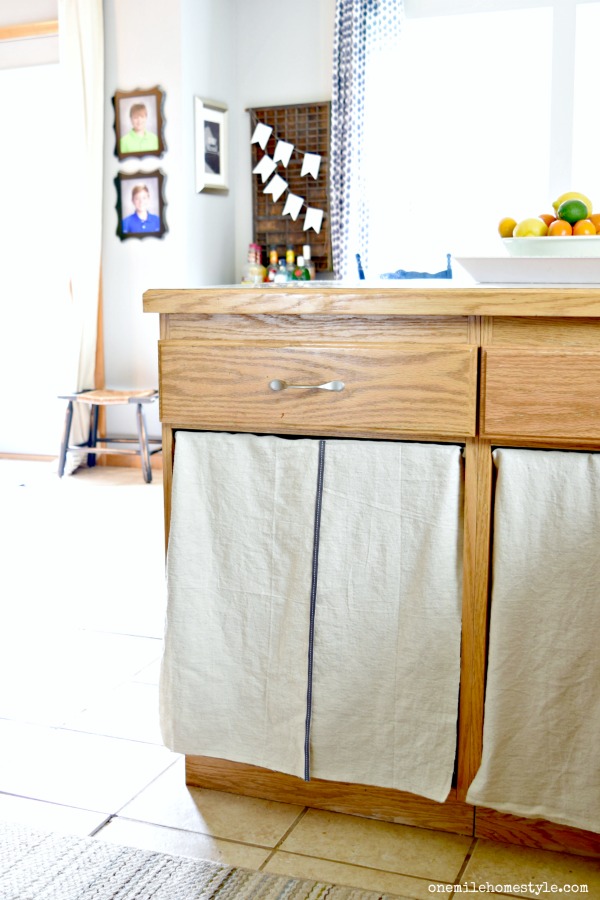
Since I am still debating on my cabinet painting options, I didn't want to buy new doors, and just needed a temporary option to class the place up a bit. I decided that cabinet curtains would be a perfect option because they would add a little farmhouse charm to the space! The first step was removing the remaining hinges from the cabinet.

Then comes the fun math part! I used a 4' x 12' drop cloth as my fabric of choice; it's durable, and it's cheap. The opening I needed to cover was 22.5" tall, so I needed half my drop cloth width for each cabinet opening. I folded the drop cloth in half length-wise and cut it, so I now had two long strips that were each 24" wide.
Then I measured the width of each cabinet opening and added 5 inches. Since I wanted to use two pieces of fabric per cabinet for an overlapped look, I then marked and cut each of those panels in half.
Then I measured the width of each cabinet opening and added 5 inches. Since I wanted to use two pieces of fabric per cabinet for an overlapped look, I then marked and cut each of those panels in half.
To attach the curtains to the cabinet, I used sticky back velcro tape. First I laid out my 2 curtain panels, overlapping them, and adjusting the overlap until together they measured 2" wider than the width of the cabinet. I cut the velcro to the width of the cabinet opening, and placed it on the front of the curtains, 1" from each edge right along the top. (I did have to use a little tacky glue to hold the overlapped pieces together at the top.)
Then I just stuck the velcro right on the inside of the cabinet and it was all done. Unless you're not; I took them back down and glued a decorative ribbon along the edge of the front panel for a little more of a finished edge, and to give them a little more definition.
Adding these cabinet curtains to the kitchen instantly make it feel less cluttered and broken, and have given the space a little more intentional farmhouse look. It's a perfect temporary fix while I make up my mind about the future of the cabinets, and would make a great long-term fix too!
You may also like:


Great solutions your mini curtains look great.
ReplyDeleteI walked tbrough a model home and the kitchen cabinets had cute curtains like that. You did really good!
ReplyDelete