
Kitchen Command Center
Are you ready to see what I was up to this weekend? I don't know why, but I had been putting off this project for a little while. I really like the end result and so far, it has been working out great for our family.
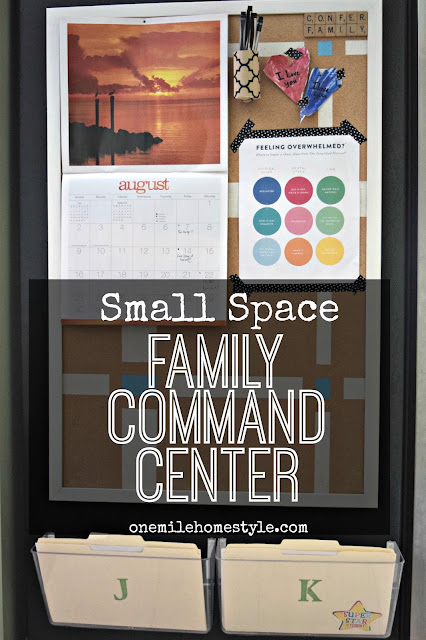
Here is our brand new (and super inexpensive) Kitchen Command Center:

I have pinned and long admired command centers that were laid out along entire walls (see what started my idea here and here). I didn't really have an entire wall that I was willing to assign this task to, but I did have a very cluttered mess of a refrigerator that would be the perfect spot.
Here is the prime real estate before the overhaul:

Really the only thing on here that we used was the calendar. I clipped party invitations and important reminders to the top and off to the left side, but everything else was just clutter.
I started with a large corkboard that was a freebie (yea!!) and sanded down the frame so that my paint would have a good base to adhere to.

The big decisions were what colors to use and how to use them. I opted for a neutral cream color for the frame and corkboard details and a little bit of bright orange on the corkboard for some contrast (both free paint samples I picked up from the local Westlake Ace Hardware). Then, I just taped off a couple of random lines in each direction.


Once it was all dry I used Velcro tape to attach it to the side of the fridge, this holds it up securely, but also allows me to adjust it to make sure it is hanging straight. I put a short nail and a binder clip up to hang the calendar and make it easy to change the months without trying to repin it each month and otherwise putting holes all over my pretty masterpiece. With that in mind, in place of push pins I am using decorative tape to attach important notes/invites/to-do's to the corkboard, this will keep the board looking nicer for a longer amount of time.

How do I control the paper? The only thing I bought for this entire project was the 2 clear acrylic file holders at the bottom (see similar here). I labeled a folder for each boy and put one in each holder. All the papers that they bring home from school each day goes into these folders.

Now for a couple of the fun little additions that I DIY'ed to complete this command center:
I had to personalize it and I had a jar of Scrabble pieces just waiting to be used.

Pen holder made from a toilet paper tube covered with wrapping paper.

Bill holder made from the bottom of a cereal box covered in wrapping paper.

I love how this turned out, it makes me smile each time I walk by it! The best part of Pinterest is taking an idea (or multiple ideas) and turning it into something that is perfect for your home and family. Do you have a command center in your home? Is it an entire wall, or one smallish space?
**This post contains affiliate links
Here is our brand new (and super inexpensive) Kitchen Command Center:

(You can see an updated look of this command center here and here.)
I have pinned and long admired command centers that were laid out along entire walls (see what started my idea here and here). I didn't really have an entire wall that I was willing to assign this task to, but I did have a very cluttered mess of a refrigerator that would be the perfect spot.
Here is the prime real estate before the overhaul:

Really the only thing on here that we used was the calendar. I clipped party invitations and important reminders to the top and off to the left side, but everything else was just clutter.
I started with a large corkboard that was a freebie (yea!!) and sanded down the frame so that my paint would have a good base to adhere to.

The big decisions were what colors to use and how to use them. I opted for a neutral cream color for the frame and corkboard details and a little bit of bright orange on the corkboard for some contrast (both free paint samples I picked up from the local Westlake Ace Hardware). Then, I just taped off a couple of random lines in each direction.


How do I control the paper? The only thing I bought for this entire project was the 2 clear acrylic file holders at the bottom (see similar here). I labeled a folder for each boy and put one in each holder. All the papers that they bring home from school each day goes into these folders.

Now for a couple of the fun little additions that I DIY'ed to complete this command center:
I had to personalize it and I had a jar of Scrabble pieces just waiting to be used.

Pen holder made from a toilet paper tube covered with wrapping paper.

Bill holder made from the bottom of a cereal box covered in wrapping paper.

I love how this turned out, it makes me smile each time I walk by it! The best part of Pinterest is taking an idea (or multiple ideas) and turning it into something that is perfect for your home and family. Do you have a command center in your home? Is it an entire wall, or one smallish space?
**This post contains affiliate links


I love this! Now I want to do something similar for my fridge.
ReplyDeleteSuper practical and you have made it really cute as well. I desperately need a command center and am in the "idea formation" stage right now... you have given me some great ideas to think about. Love the folders for each of your boys - that daily paperwork from school is always hard to deal with!! Thanks for sharing this,
ReplyDeleteKrista
Thanks for stopping by! The folders have definitely been a huge help, the boys have been awesome at putting their papers in the folders, and now my countertops are less cluttered. Good luck on your command center!
DeleteStephanie
Looks great, I love this idea. A few simple steps and you end up with a stream lined space. My fridge could use some help, thanks for the inspiration.
ReplyDeletehttp://creativeramblingsblog.com/
Stephanie! I love your command center. You dressed it up nicely and so easy for anyone to do. Thanks for sharing at Throwback Thursday.
ReplyDeletexoxo
Denyse